
Creating a Cloudstack CoreOS Template
You have a couple of choices when it comes to using CoreOS on Cloudstack and XenServer. You can always follow the CoreOS tutorial which gives you the simplest way to get going.
If you want to build a template from the latest (or particular) alpha, beta or stable CoreOS version , follow these simple steps:
- Copy the CoreOS ISO URL of the required type (Alpha / Beta / Stable) from: https://coreos.com/docs/running-coreos/platforms/iso/. You’ll use this URL in Cloudstack shortly.
- Upload the ISO into Cloudstack -> Templates -> Select view: ISO -> Register ISO
- Name and Description: coreos-(alpha|beta|stable)-version
- URL: The Cloudstack Management Server will download the file from the specified URL.
- Zone: Choose the zone where you want the ISO to be available, or All Zones to make it available everywhere.
- Bootable: Checked.
- OS Type: Other 64-bit.
- extractable: Your call. This determines whether users can generate a download URL for your ISO.
- Public: Checked.
- Featured: Your call. If featured it will be shown in the featured ISOs list of ISOs in the Instance deployment wizard.
- Create an instance from the ISO choosing an appropriately sized disk offering. I choose 50gb as this is more than enough for my needs. You’ll want at least 2GB of RAM (selecting 512mb causes panic on startup, so aim higher).
- Once the VM is created, navigate to the instance and click to view the console
- Install CoreOS onto xvda:
- sudo coreos-install -d /dev/xvda -C stable -o cloudstack
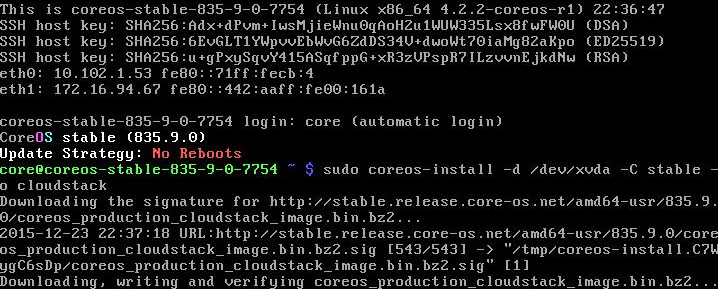
- sudo coreos-install -d /dev/xvda -C stable -o cloudstack
- Stop the VM and template.
- Take a snapshot of your instance’s ROOT Storage volume
- Once the snapshot is complete, create a template from the snapshot, ensuring the template’s OS Type is set to ‘Other 64-bit’
- Name and Description. coreos-(alpha|beta|stable)-version-template
- OS Type. ‘Other 64-bit’
- Public. Checked.
- Password Enabled: Checked. Although, you won’t use a password, you’ll use SSH keys.
- Dynamically Scalable: Unchecked.
- Wait a while for the template to be created.
- Copy the template to all appropriate zones
You now have a clean XenServer CoreOS template that is ready for all your distributed computing needs.
Repeat this process when you want to build an alternate CoreOS template.
You will quickly find the need to pass userdata to your VM to configure your SSH keys. This can be done by using the Cloudstack API.